FinRobot의 대항마, FinBrain
가슴이 옹졸해진다

지금까지의 그래프를 시각화하면..
display(
    Image(
        finbrain_graph.get_graph(xray=True).draw_mermaid_png()
    )
)
3개의 팀을 위한 State를 만들었음. 물론 지금 스키마가 동일한 상태지만 개별로 나눠놨음
# State 정의
class DataState(TypedDict):
    messages: Annotated[list, add_messages]
    next: str

# State 정의
class FinanceState(TypedDict):
    messages: Annotated[list, add_messages]
    next: str

# State 정의
class ReportState(TypedDict):
    messages: Annotated[list, add_messages]
    next: str

class State(TypedDict):
    messages: Annotated[list, add_messages]
    next: str
아무튼 궁금증이 생겼다.
이 궁금증은 지금 작성하는 글의 시발점이라고 할 수 있음
궁금한 점: A State를 사용하는 A graph가 B graph가 사용하는 B State의 키 값을 어떻게 업데이트하지?
이런 랭린이 같은 질문은 공식문서와 테디노트님 글에 아주 잘 나와있었다..
How to use subgraphs
Home Guides How-to Guides LangGraph Subgraphs How to use subgraphs Subgraphs allow you to build complex systems with multiple components that are themselves graphs. A common use case for using subgraphs is building multi-agent systems. The main question wh
langchain-ai.github.io
13. 서브그래프 추가 및 사용 방법
.custom { background-color: #008d8d; color: white; padding: 0.25em 0.5…
wikidocs.net
정리를 하자면
- 그래프의 스키마가 다르면, 데이터 변환 과정이 필요하다
- 별도의 노드 함수를 추가하여 상태를 변환 후 호출해야한다.
여기 서로 다른 스키마를 가진 2개의 State가 있을 때
# Define subgraph
class SubgraphState(TypedDict):
    # note that none of these keys are shared with the parent graph state
    bar: str
    baz: str

class ParentState(TypedDict):
    foo: str
노드 함수 node_2에서
- ParentState 를 하위 그래프(subgraphState)로 변환
- 노드에서 상태 업데이트 반환하기 전에 다시 Parent State로 변환
하는 것을 볼 수 있음
def subgraph_node_1(state: SubgraphState):
    return {"baz": "baz"}


def subgraph_node_2(state: SubgraphState):
    return {"bar": state["bar"] + state["baz"]}


subgraph_builder = StateGraph(SubgraphState)
subgraph_builder.add_node(subgraph_node_1)
subgraph_builder.add_node(subgraph_node_2)
subgraph_builder.add_edge(START, "subgraph_node_1")
subgraph_builder.add_edge("subgraph_node_1", "subgraph_node_2")
subgraph = subgraph_builder.compile()


def node_1(state: ParentState):
    return {"foo": "hi! " + state["foo"]}


### ### ### ### ### ### ### ### 여기여기### ### ### ### ### ### ### ### ### ###
def node_2(state: ParentState):
    response = subgraph.invoke({"bar": state["foo"]})
    # ParentState에 맞게 변형하기
    return {"foo": response["bar"]}


builder = StateGraph(ParentState)
builder.add_node("node_1", node_1)
# note that instead of using the compiled subgraph we are using `node_2` function that is calling the subgraph
builder.add_node("node_2", node_2)
builder.add_edge(START, "node_1")
builder.add_edge("node_1", "node_2")
graph = builder.compile()
Schema(스키마)
그렇게 첫 번쨰 궁금증은 해결되었는데.. State 관련해서 찾다가 "다중 스키마" 라는 걸 보게됨
정리하자면,
- Private하게 주고 받을 정보가 있을 때
- 입/출력 스키마를 다르게 설정하고 싶을 때
다중스키마를 사용한다고 함.
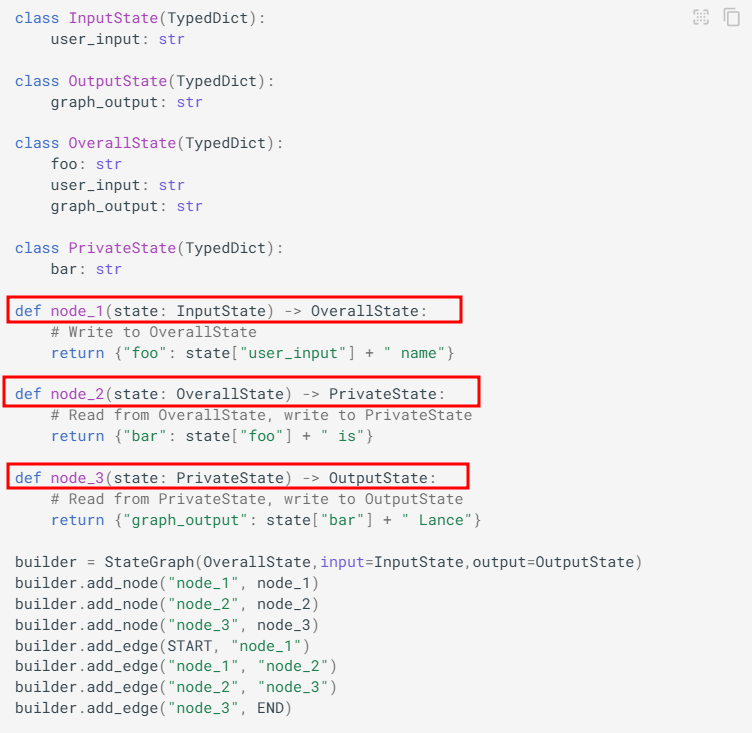
아래는 공식문서에 적힌 예시인데,
InputState 데이터가 OverallState로 확장될 수 있다고 표현함
PrivateState는 StateGraph에서 선언되지 않았지만, 미리 정의만 되어있다면 사용 가능
위 예시 코드에 중간 중간 state 출력하는 노드를 추가해서 결괏값을 보면,
각 반환 State 값들이 출력되는 것을 볼 수 있음
# STATE 출력용 노드 추가
def print_node_1_state(state: OverallState) -> OverallState:
    print(f"[node_1 STATE]: {state}")
    return state  # 상태 그대로 반환

def print_node_2_state(state: PrivateState) -> PrivateState:
    print(f"[node_2 STATE]: {state}")
    return state  # 상태 그대로 반환

def print_node_3_state(state: OutputState) -> OutputState:
    print(f"[node_3 STATE]: {state}")
    return state  # 상태 그대로 반환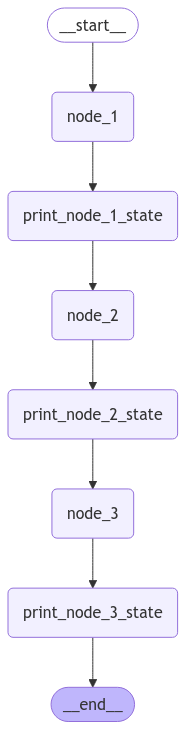
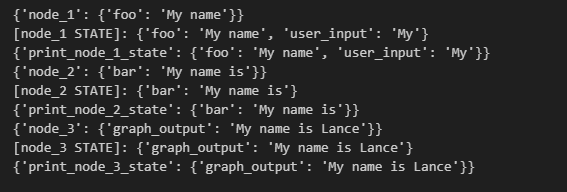
근데 좀 놀랍다고 해야하나
밑에 처럼 사용할 State 만 띡띡 넣어주는데,
그래프에서 발생한 업데이트들을 지정한 State에 저장해주고 있으니까 말이다
def node_1(state: InputState) -> OverallState:

def node_2(state: OverallState) -> PrivateState:

def node_3(state: PrivateState) -> OutputState:

builder = StateGraph(OverallState,input=InputState,output=OutputState)
이게 다, StateGraph 덕분 아니겠는가
langgraph/libs/langgraph/langgraph/graph/state.py at main · langchain-ai/langgraph
Build resilient language agents as graphs. Contribute to langchain-ai/langgraph development by creating an account on GitHub.
github.com
위 예시에서, StateGraph를 아래와 같이 초기화했음
builder = StateGraph(OverallState, input=InputState, output=OutputState)
그러면, StateGraph.__init__() 에서는
OverallState가 state_schema로 설정되면서 input/ouput을 별도로 유지하고 있음
if state_schema is None:
    if input is None or output is None:
        raise ValueError("Must provide state_schema or input and output")
    state_schema = input  # state_schema를 input으로 설정

else:
    if input is None:
        input = state_schema  # input이 명시되지 않았다면 state_schema를 사용
    if output is None:
        output = state_schema  # output이 명시되지 않았다면 state_schema를 사용
그리고 add_node() 보자
builder.add_node("node_1", node_1)를 호출할 때,
input을 명시적으로 전달하지 않았기 때문에 input의 기본값은 None
def add_node(
    self,
    node: Union[str, RunnableLike],
    action: Optional[RunnableLike] = None,
    *,
    metadata: Optional[dict[str, Any]] = None,
    input: Optional[Type[Any]] = None,  # 노드의 입력 스키마
    retry: Optional[RetryPolicy] = None,
    destinations: Optional[Union[dict[str, str], tuple[str]]] = None,
) -> Self:
만약 input이 None이라면
노드의 함수 시그니처를 기반으로 입력 스키마를 설정하게 했음
함수 시그니처는 매개변수와 반환 타입 포함하는 함수의 정의라고 보면 됨
if input is None:
    first_parameter_name = next(
        iter(
            inspect.signature(
                cast(FunctionType, action)
            ).parameters.keys()
        )
    )
    if input_hint := hints.get(first_parameter_name):
        if isinstance(input_hint, type) and get_type_hints(input_hint):
            input = input_hint
결론적으로 띡띡 적기만 하면, 알아서 잘 참조해준다
import inspect
from typing import TypedDict, get_type_hints

# 예제 TypedDict 스키마 정의
class InputState(TypedDict):
    user_input: str

class OverallState(TypedDict):
    foo: str
    user_input: str
    graph_output: str

def node_1(state: InputState) -> OverallState:
    return {"foo": state["user_input"] + " name"}

# 함수의 시그니처 가져오기
signature = inspect.signature(node_1)

# 첫 번째 매개변수의 이름 가져오기
first_param_name = next(iter(signature.parameters.keys()))

# 함수의 타입 힌트 가져오기
hints = get_type_hints(node_1)

# 첫 번째 매개변수의 타입 힌트 확인
input_hint = hints.get(first_param_name)

# 결과 출력
print(f"함수 시그니처: {signature}")
print(f"첫 번째 매개변수 이름: {first_param_name}")
print(f"첫 번째 매개변수 타입 힌트: {input_hint}")
마무리
이 모든 내용은 아 그렇구나 하고 넘어가면됨
'MLOps > Development' 카테고리의 다른 글
| 금융-투자 AI Agent가 CoT 프롬프팅을 필요로 하는 이유 (4) (0) | 2025.02.27 |
|---|---|
| 금융 전문가 Agent - Fred API (3) (0) | 2025.02.21 |
| 금융 전문가 Agent - 오픈소스 FinRoBot (1) (1) | 2025.02.07 |
| Pyside6로 만든 EXE 파일을 수정하다 알게 된 것들 (2) | 2023.07.09 |
| NCloud API 배포 시, Usage Plan 적용하기 (0) | 2023.06.26 |


